Amazon Lister – Create & maintain offers from JTL Wawi
In a nutshell…
- The Amazon Lister is a JTL function and allows us to create and maintain offers for the Amazon product catalog directly from the Wawi.
- Data fields stored in the Amazon Lister Editor can be linked to item master data
- We only need to define these links once per Amazon category. Each new product listing automatically pulls the data from the linked item master data fields
- In the standard scope missing for the respective Amazon category required item master data can be maintained in custom fields
Listing process in the Amazon backend
Some of you will certainly know it: If you want to offer your products on Amazon, you have to enter all information manually via the Amazon backend. Alternatively, you have the possibility to upload your product data via so-called “flat files” (which are nothing else than Excel tables) and thus list several products at once. It is also possible to connect your own products to existing offers via the backend.
Not so long ago, this kind of listing was the only alternative to upload your products on Amazon. However, anyone who has ever worked with flat files will know that this process is far from optimal. For one thing, the categories available on Amazon and the item features associated with the categories change regularly. So you have to find your way around the flat files every time. On the other hand, if there is an error, all items will be rejected. Since you have to enter the data manually, there are bound to be careless errors from time to time or important features are forgotten. All in all, a laborious process.
Now some of you also know that there is an Amazon Lister function in JTL since version 1.0. Maybe you already know them, but maybe you have shied away from them until now. This article will show you the advantages of listing Amazon directly from Wawi and explain the basic procedure. First, let’s take a look at what the Amazon Lister is.
Amazon Lister
The Amazon Lister is a JTL feature and allows us to create and maintain listings for the Amazon product catalog directly from Wawi. The Lister has an integrated editor that guides us step by step through the listing and offers all the data fields belonging to the Amazon category. Furthermore, it is integrated into the Amazon offer management. So all offers created with the Lister can be controlled as usual in the marketplace management. The data exchange to Amazon takes place via the interface JTL eazyAuction.
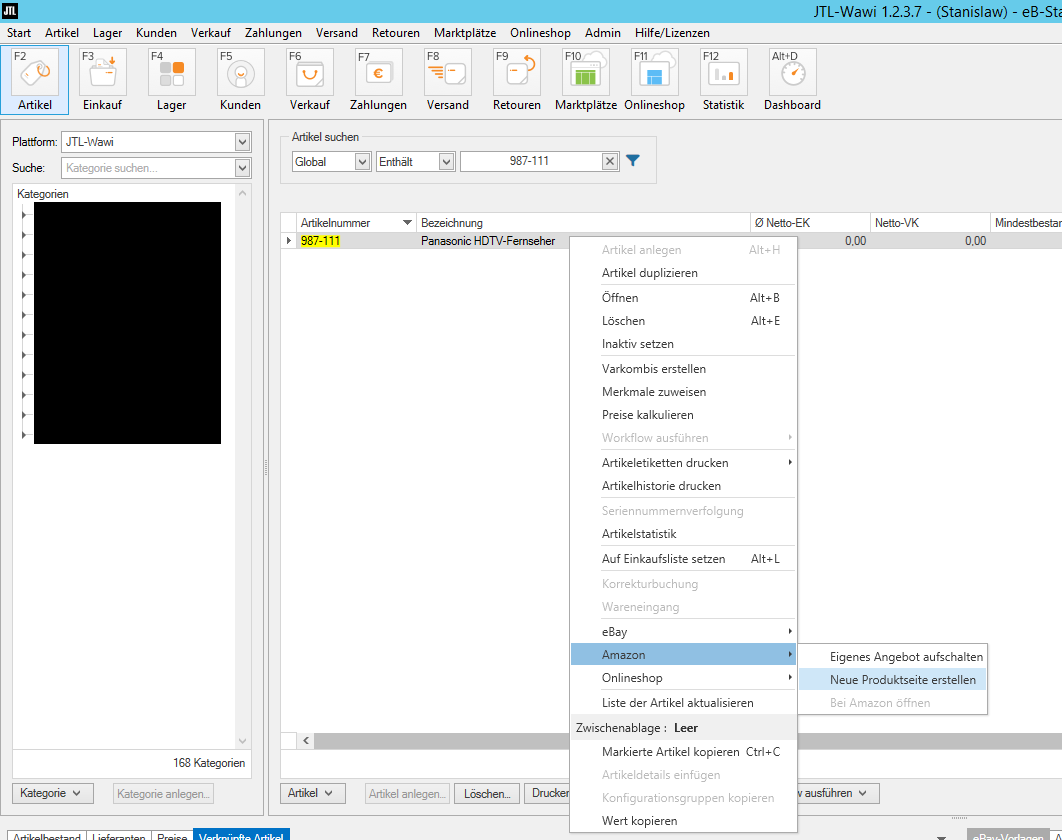
We would now like to outline the procedure for a new product page schematically. The Amazon Lister can be called up in the item management. We highlight our item to be listed with a right click and navigate to Amazon. Here we have the possibility to add our product to an existing Amazon offer(Add own offer) or to create a new offer in the Amazon product catalog(Create new product page).
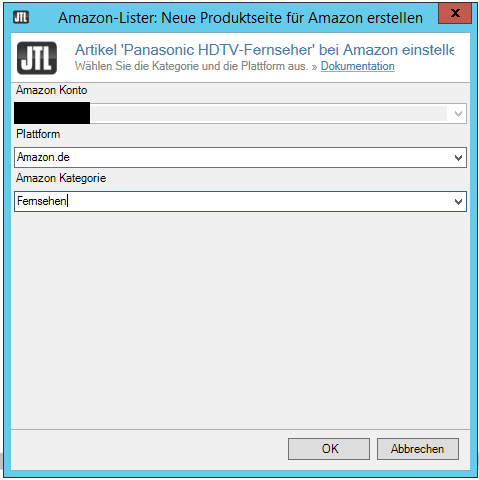
If we now click on Create new product page, a preselection mask opens first. Here we can determine for which Amazon account, on which platform and in which Amazon category we want to list our product. Currently, Amazon.de and Amazon.co.uk can be selected as platforms. The categories represent the respective category structure on the platforms.
We pick out the category that suits us. Now let’s click OK, then we will get to the Amazon Lister Editor. Here we can store item features for our offer just like in the Amazon backend. All data fields are present, only the arrangement of the fields is slightly different in relation to Amazon and is extended by some JTL data fields. The entries marked with an exclamation mark are mandatory. All other values are optional but absolutely recommended for better visibility of the offer on Amazon. Which fields are displayed in the editor depends largely on the set category.
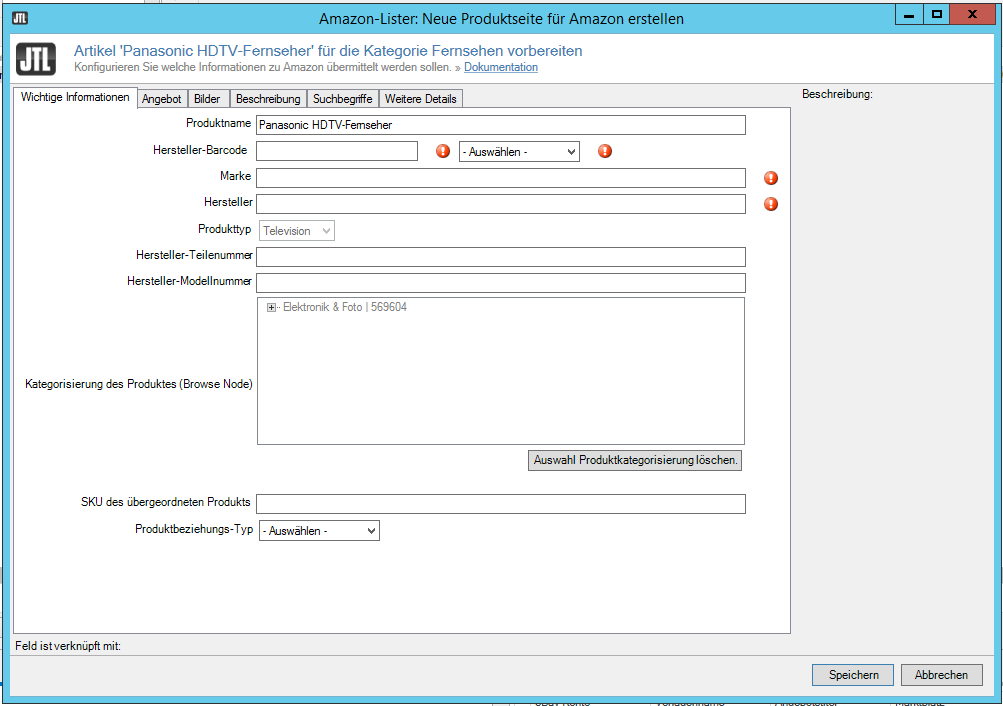
There is some infomation that Amazon Lister already pulls from the item. These are in particular the product name in the Important Information tab, the seller’s SKU in the Offer tab, images stored in the article and activated for Amazon as well as the product description in the Description tab, if an article text has been stored for Amazon at article level. All other information is to be filled in by ourselves.
Clicking Save only creates the product page in Wawi. To transfer the entries to Amazon, we switch to Amazon > Self-created product pages in the marketplace management. In this overview we can find all product pages created by us with their respective status.
- To be posted: item has been prepared but not yet transferred to Amazon.
- Sent: Offer has been sent to Amazon.
- Successful: The offer was successfully transferred and listed on Amazon.
- Incorrect: The offer contained an error and could not be listed.
To transfer our items with the status Deposited to Amazon, we click Start Amazon Matching in the lower left corner. The status then changes to Sent and if our information was correct after a while to Successful. If there is an error, then by right clicking on the faulty item with error messages we can view the reason in detail.

Why actually change?
Perhaps you are wondering what the actual advantage of the Amazon Lister is. At first glance, most of the data has to be maintained by hand just like Amazon. If it weren’t for a certain Lister function that does this work for us. Namely, we can link Amazon Lister fields with item master data in a very elegant way.
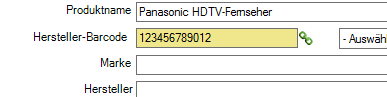
To do this, let’s go back to the Amazon Lister Editor and target the Manufacturer Barcode field. A small red chain link appears to the right of the input field. We click on it and get to a shortcut screen. Here we can either link the field to a fixed value or link it to an item property. If we choose the latter, we can select our desired item property from the dropdown. All fields in the editor can be linked to article master data in this way.
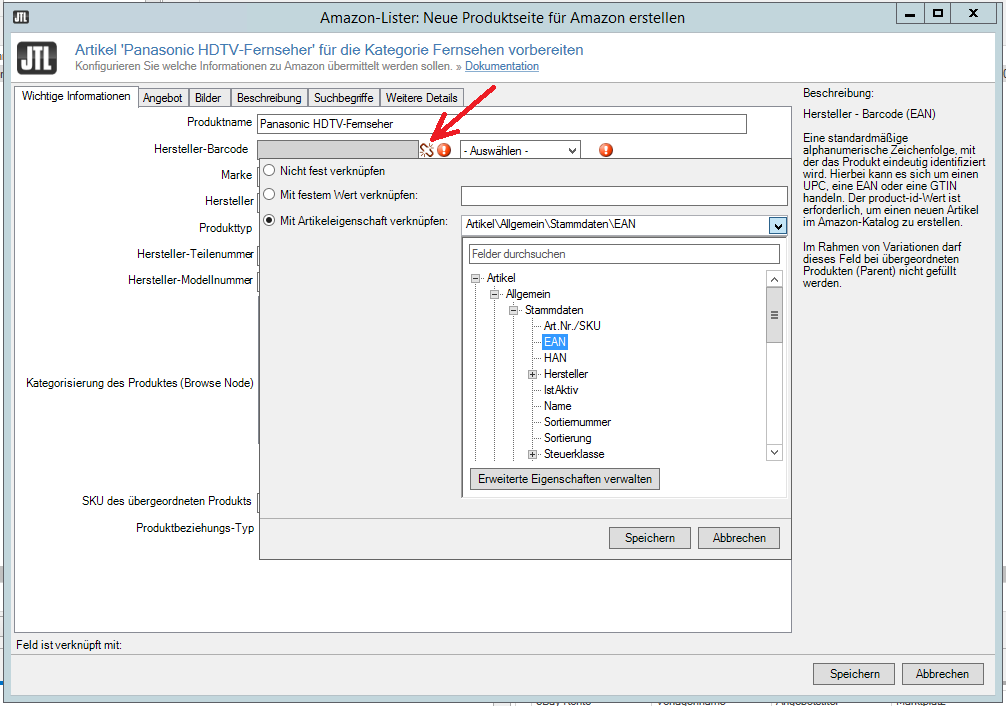
And now comes the big bang! We only need to define these links once per Amazon category. Each new product listing automatically pulls the data from the item’s linked master data fields. How convenient is that! In addition, we can recognize linked fields by their yellow marking. This allows us to see at a glance which fields we maintain when creating a quote. All fields that are not linked can be entered manually for the individual offer as desired.
However, there is a small hitch: Not all Amazon item details can be maintained in JTL in the item level by default. For example, there is no possibility to store Amazon attributes or “bullet points”. But here we can use another JTL function, namely the custom fields. We have the ability to create and maintain custom fields 12 different types in the JTL article. The properties of the custom fields are the same as those of the regular fields and can be used in the same way, i.e. they can also be linked in the Amazon Lister.
On the topic of custom fields, we have written a detailed article with step-by-step instructions on how to create and maintain them: https://ebakery.de/jtl-wawi-1-0-eigene-felder/.
Conclusion
Gone are the days of opaque “flat files” and extended copy-paste marathons. What JTL offers us with Amazon Lister is a simple elegant way of a clean listing from one source. We always have full control over which fields we want to link. The level of customization allows each dealer to find the configuration that suits them best.
We would like to point out two things in particular. First, there are some minor differences in the listing of variation combo items from the procedure described here. On the other hand, the category templates for Amazon are updated with each new Wawi version. If you don’t want to risk an insurmountable error, we recommend to keep your JTL version as up to date as possible. More information and a comprehensive tutorial with example videos can be found in the JTL Guide: https://guide.jtl-software.de/Neue_Produktseite_mit_Amazon-Lister_erstellen.