Shopify Shop Create 2023
Create a store in under 30 minutes with this step by step guide
In this tutorial, we’ll show you how to create a Shopify Shop 2023 in under 30 minutes. Starting with registration, to discount promotions and the mandatory legal texts. So watch this video before you get started with Shopify.
Shopify store create 2023 in under 30 minutes
If you want to know how to build a Shopify store from A to Z in 2023, then you’ve come to the right place. In the following video we explain each step to get your online store ready for sale. If you would like to optimize it, e.g. by adding a new file, you can do so. to increase your findability for search engines, then you should definitely check out our Shopify Playlist. There we went through almost every relevant topic in detail. However, if you have a concern that isn’t addressed there or would benefit directly from our expertise, we’re happy to help you as a Shopify agency. Whether store creation, optimization, consulting or SEO, secure your free initial consultation.
Shopify Shop Create 2023 - The registration
But now we want to start. Our first step is the registration. So let’s go to the Shopify website: www.shopify.com and start our free trial here. Meanwhile, Shopify has reduced its trial period from 14 days to 3 days. What is still the case is the fact that you do not have to deposit a credit card or anything else for this period. After 3 days you simply cannot use the store anymore as long as you have not purchased a plan. However, to create this in the first place, we go ahead and tell the generator that we don’t have any experience in online sales yet. The good thing about Shopify is that virtually every form of sale is supported. Selling your own products, print-on-demand, dropshipping and so on. However, for this video, we want to build a normal online store from scratch without a pre-existing social media presence or anything like that. Accordingly, in the next step, we also select “products” as a sales item. In the next step we click on “No” because we have no presence. Now you have to decide on a store name. Two things are important for this in advance.
Note these 2 things in advance
Firstly, the name should not include an already registered trademark. To check it out, we go to “www.dpma.de”. This is the official website of the German Patent and Trademark Office. Here we go to the DPMA register and there to trademarks. And enter our favorite store name in this search mask. In our case “T-Shirt Store 24/7”. If you then see that the database does not return any hits, you can be sure that this name has not been registered as a trademark. Step 2 would then be to secure your social media before creating your Shopify store. So creating the Instagram account with the name, Facebook page, TikTok, email address depending. Once you have done this, enter the name and click “Next”. Now you just need to determine in which country your company location is and then in the next step which base you want to use as Shopify ID. This is important for the login in the future. We select the email and enter our company email address and assign a secure password. Make a good note of this, as you will need to use it for login in the future, as mentioned earlier. With the creation of the Shopify ID, your base store is then also created. So that’s the standard framework that we can build on right away.
The backend navigation bar
Welcome to the headquarters of your online store. Here we are in the backend, admin area, call it what you like. We can navigate through the backend using the left sidebar, which is again divided into 4 sections. The first area goes from Home to Discounts and accordingly includes the organization. This means you can manage your past and current orders, create products and, for example, create new ones. organize in categories, we’ll look at that in a moment, but also get you statistics, about sales, conversion and much more. You can also create marketing campaigns and create discounts to give out to influencers you work with. This is the first section, the second section is the tree menu. Here you can virtually determine the look of your store. At the heart of it, as with all other store systems, is the theme. This gives you the basic optical framework, so to speak. So videos are used, products are shown, how are products shown, as an image? As a slideshow? As a collage? What colors are used, etc.
It always starts with the home page. This then determines the basis for all other pages. This can be e.g. be the imprint, the contact page, the revocation policy, which in turn can be created and customized in the page submenu. Then again, to get from the home page to the individual subpages, we need the navigation. This consists of footer and header, which can be linked to the pages in the navigation submenu. So now you know why I call the second section Baumenü.
Shopify Shop Create 2023 - The App Management
The third section is the app section. You can simply open the Shopify App Store in a new tab. Here you can find many extensions that complement the native settings and options of Shopify. These can be nice-to-have tools, like notifications for the newsletter, for discounts, for the fact that someone has just bought something in the store, etc., but they can also be essential tools, like the GDPR Legal Cookie Banner, which you need to make your Canadian store system legally compliant with German law. How to do this, you can see again in our playlist “Shopify Shop rechtssicher machen”, which we have created in collaboration with the Händlerbund. These individual apps can then be viewed and accessed in the third section. The fourth section is the settings, which we will now take a close look at.
Shopify Shop Create 2023 - General Shop Settings
In the Shop Details menu you can customize general information about your store. The phone number, the email address, but also the store currency, the time zone, and so on. Everything else is not relevant if you have only one Shopify store. As I said before, you can now test Shopify for only 3 days. If you have already seen enough, you can choose a plan in advance or deactivate the test phase. But even if you do nothing at all, you will not be charged or anything else, you will just not be able to access the store after 3 days. By default, you have 3 plans at your disposal, which differ in price, of course, but then offer you accordingly more. On the one hand, more employee accounts, but also a decreasing transaction fee, which shrinks from 2 to 1 to 0.5%, which can then be worthwhile if you sell a lot. To be able to book a plan, either a credit card or PayPal should be stored under Billing. Furthermore, you should enter your VAT ID at the bottom. If you have employees, you can create accounts for them in the “Users and permissions” menu. For diligent viewers of our channel, the term granules permissions will also be no stranger. This means that even more precise settings can now be made as to what the employee has access to and what not. For more, check out our Shopify Editions 2023 playlist. To ensure that payments are made to the correct account, you need to enable Shopify Payments or add PayPal or Amazon Pay. To do this, first enter your contact information and then enter more detailed information in the next step. Important here is the UST-ID number, as well as the correct IBAN. So pay attention to this. Once you have entered everything, you can click on “Complete account setup”. You can find out more about Shopify Payments in our detailed video. The next point is the checkout. You can specify here whether orders, for example. should only be possible if the customer has a customer account. Accordingly, it must of course also be registered. But, the fewer hurdles, the more sales, so think twice.
You can leave the rest on factory settings, just make sure at the end that the language “German” is selected.
The shipping settings
The next big point is shipping. To make things easier, we assume for this video that only shipping within Germany is offered. That means EU and rest of the world we delete out. And the contents of Germany as well. We will create a completely new shipping rate. A standard tariff would be for example 2 – 4 working days for 5€. However, you can also create conditions, such as Changes according to weight or else according to order price. So if someone buys for 200€, shipping costs nothing. This way you can integrate your existing tariffs bit by bit and also create them for Austria and Switzerland. The next point taxes and customs is a legal topic for which we are not allowed to give legal advice and also cannot give blanket advice. This depends on whether you are a small business owner, whether you have signed up for the one-stop store, whether you file a separate VAT return for each individual country, etc. If there are any questions about this, feel free to contact us, we can recommend a top-notch tax advisor who specializes in eCommerce issues. In the following, at most the domain menu is relevant, as you can either link your already purchased domain here or purchase a completely new domain via Shopify. Your CI, i.e. corporate identity, which includes something like your logo, your primary and secondary color, your company slogan, etc., you can integrate in the brand menu, so that these settings are then also applied globally. Any email templates can be customized in the Notifications submenu. Don’t worry, you don’t have to know how to program, because many things are easy to understand. Do you want e.g. instead of “purchase”, use “acquisition”, this can be easily adjusted in the code. And lo and behold, this has been changed in the email preview as well. All other menu fields explain themselves in principle, after once again exciting will be the guidelines. However, these can also be called up at another point. In any case, this is where the legal texts come in. Now you know which settings options are available and what they stand for.
Create a new product
In order to have something to insert right away in the big Theme Editor part, it makes sense to create new products next. Therefore, in our first section we will go to the product menu. Here we put on once our first T-shirt. This is supposed to be a basic black shirt. Accordingly, we name it. First of all, it should be said that we do not discuss SEO aspects in this video. If there are any questions, you can still ask them in the comments or watch our Shopify SEO detail videos. So rudimentary important for product creation is the first area: title and description. But also the right area, where you have to make sure that the article is active and the checkmark is set for your online store. To save us work right away we give the product one day. You will see why this is relevant in a moment. Below this, the category must be assigned, if it was created, everything else is optional and serves rather the internal organization. Now we have the possibility to add several images. The next box indicates the price. Here, only the main prize is important for the time being. Drop prices are then more relevant for marketing and base prices are legally required for certain items such as food. It is best to inform yourself about this separately.
Shopify Shop Create 2023 - Organize products into categories
Since a stock of goods of 0 is set as factory setting, this must still be adjusted. Let’s just set it to 10. You can also use e.g. Enabling overselling is not something I would advise you to do in the beginning. If e.g. the weight becomes relevant for shipping, this should also be entered here. That’s all you have to do for now, except press Save. We now do the same for our second product in fast forward. Since we now have two products, it also makes sense to create a new category. Therefore, we go to the corresponding menu and create a new one. We call these times quite simply “basic T-shirts”. Now our product tag comes into play, which is present in both products. Namely, we can perform the assignment manually or automatically. If this is set to “automatic”, we can define a specific condition according to which the assignment happens. Ex. the product tag shirts. Now we see that both shirts were included in the category. So that it is also directly recognized visually what the category is about, we still leave a category image. Now all you have to do is save.
Include categories in navigation
So that we can also access this category from the header, we still need to link it in the navigation. To do this, we go to Navigation, to the main menu and add a new menu item. We name it after the category and select the category we just created. We add them and save. Now if you want to check anything you changed in the backend, here’s a small but important tip. Next to your online store in the building menu, this eye appears. With the eye you will always get directly to the frontend, i.e. the visual area that your customers will also see. And lo and behold, there we can see for ourselves that the category has been added to Header. What is still not really appealing, however, is the rest. How you fill all these placeholders and add more construction kit elements, I’ll show you now.
The Theme Editor
We go back to the backend and go into the theme settings. So what is a theme? In principle, this represents a container for the external appearance. If you scroll down a bit, you can see how different this can look. Accordingly, a few themes are already stored in Shopify, but there are thousands of other themes in the Shopify Store, but also for example on Envato Elements or Envato Markets. To demonstrate how you would proceed if you wanted to change a theme, we add the Craft Theme. This is then loaded into the library. This may take a brief moment. From there, you can publish it so that it replaces your currently active theme. Now we want to customize this, so we click on “Customize”. And you can see directly, the colors are different, the font is different, the placeholder containers are different, but the header is the same. So you can already see, everything that has to do with the look, that is determined by the theme, but everything that is under the hood, like the products, the categories, the navigation etc., that remains and is not part of the theme. Where we are now is the theme editor. This is divided into 3 sections. The actual editor, the theme settings and the app management. For this video we are only interested in the first two menus. Let’s start with the settings. Because here you can make global settings. This saves you time. For example, you don’t have to adjust the font in every content blog, but can define it globally once, which is then applied to all containers. The first thing you can add is your logo. If you don’t have a logo ready yet, we recommend the following. Either you let it be done, then you can get cheap graphic designers via Fiverr, who can quickly create it for you according to your ideas, or you get creative yourself on Canva. Here, the technical implementation is a snap. If you need something like category images or mood shots for the home page, sites like pixabay.com, freepik.com or unsplash.com are great. Another alternative would be DALL-E from OpenAI, with which you let the artificial intelligence create images as you imagine them.
Shopify Shop Create 2023 - The Global Theme Settings
For our test store, we’ll just use the eBakery logo to demonstrate what happens. Without you having to do anything, this will be placed on the home page. Why does this happen? Because within the theme at the place a logo placeholder was integrated. Maybe now it becomes clearer why you should start with the global settings. The favicon is the image that is displayed as a logo in the URL line. Otherwise, many other options can be customized. The colors, the fonts, certain distances to each other, the visibility and width of buttons, the whole thing then again for the display of variants, you can and should apply your social media channels, as these are then displayed in the footer in pretty much every theme. So very very many options, but they are self-explanatory. For all those who know CSS. Here you can now also place global CSS commands in the theme code, which then affect the entire online store. If there are any other questions about the global settings, post them in the comments. Now let’s switch to the construction menu. Since we have already created categories and products in advance, let’s integrate our category into the placeholder. This should also explain the logic behind this editor. The middle box is what the customer sees at the end. So your monitor window, because quasi what is to be seen finally is displayed. The monitor field runs parallel with the structure bar on the left. For example, if you click to a lower container, the monitor field jumps directly there and shows you, so to speak, what is currently selected and what you are currently editing. You can edit selected elements with this navigation here. This means to move the position one place forward or backward, to duplicate this container, to hide it or to delete it. If you don’t want to delete the whole container, but only parts of it, then you have to select them and you can only delete them instead of the whole. The right column, on the other hand, is intended for all inputs. Be it text input, inserting images, selecting categories or products, determining the size, etc. Once you understand that, you also understand how to easily put together your store without any prior knowledge. Things get tricky when it comes to individual requests. But we at eBakery are happy to solve these. Our Shopify partner page is linked in the description. Accordingly, the entire theme is composed of the following elements
How the Theme Editor works
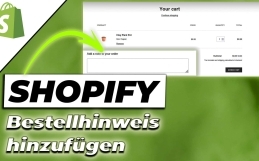
You have here the main container, which you can also collapse and within this main container, the individual elements contained. Do you want to use e.g. instead of an image, have a video in the container, you can select the image, delete it in the monitor window and add a new blog. Namely, a video. You can then add this video to the right column, for example, by clicking on “Add video”. a YouTube link deposited. Then you can here for example. you can also create a separate thumbnail that is displayed when the video is not being played. If you select a text field, it will be divided into a heading and a description. If you adjust this in the right column, it will also change in the monitor window. But what about when a desired element is absolutely not included in the theme at all. No problem. Then you can add a container or here also called “section” at the very end in the left column. You see you can choose from a whole palette of different variants to create exactly the store you have imagined. Try your hand at being creative. In the end, you can’t do anything wrong, because every change is displayed directly in the monitor field. If you don’t like it, you can simply go back one step in the upper right corner. However, the whole thing can be applied not only for the home page, but for any other page, exactly the same way. Thus, the shopping cart, checkout, as well as any other page, as well as product detail page can be customized easily and intuitively. However, to check that this is ideally displayed not only for the PC but also for the smartphone, the smartphone view can also be emulated. So we are also through with the Theme Editor.
If you want to integrate an external theme that you have purchased from another store, here is again the appropriate detail video linked.
Shopify Shop Create 2023 - The legal texts
Now we have theoretically a saleable store, with which practically it is better not to sell, because what is missing are the legal texts. Here you have several different options. Either you consult a lawyer and have them write it for you, which would be the most expensive option and is not really necessary. For one thing, there are legal text generators from Trusted Shops, IT Rechtskanzlei, Händlerbund and some others. On the other hand, these just mentioned offer a store depth check. This means that a lawyer checks whether your store is legally compliant, i.e. whether the legal texts have been correctly created and integrated. We have shown you how to use the generators for both the Händlerbund and Trusted Shops. Once you have created them, you need to create the respective pages for the terms and conditions, the cancellation policy, the imprint and the privacy policy. We do this now exemplary for the imprint and use the eBakery imprint. So as a title really write imprint and as a description, copy and paste the imprint that your legal text generator has created for you. After that save. What is now mandatory is to link the page with the navigation, so that the page visitor also has the possibility to get to the imprint. So let’s go to the navigation menu, the footer menu. We add a menu item and name it. This must be named exactly as the page or exactly as the legal text generator specifies. Now we link the created page and add it. Afterwards do not forget to save. Now we can use the eye again to check that everything has gone right. And lo and behold, an imprint link was added and the imprint is actually displayed in terms of content. This is exactly what you are doing now for the other legal texts. This would give you a complete, saleable online store.
The apps management
But for the sake of completeness, I’ll show you two more things. On the one hand, the app area. Existing apps are managed here, but new apps can also be added. You will be redirected directly to the App Store, where you will be automatically logged in with your Shopify ID. You have the option to search by category or directly enter a specific app in the search bar. As an example, just use the GDPR Legal Cookie Banner extension. You can find out which one to take either from our advice or from the ratings given. 4.9 stars with 615 reviews sounds convincing. So we click on it, can get more info here, but also directly add the app. If you then click Install App, the app will be added to your Apps section and you can customize it from there. You can then do the same for each additional app.
The Theme Editor
The last point are the discounts. Discounts are always a good way to boost sales. You have 4 different types to choose from. Either a discount on a specific product or a general order. That is, you get so and so much percentage on this order. The third variant is linked to the condition of purchasing a product and receiving another product in addition to the purchase. The last discount is a free shipping discount. We’ll go over that once for this video for a product discount. All others can be taken from our detail video. First, a discount code can be generated or defined by yourself. Subsequently, a fixed value or a percentage can be specified. Do we want to give the discount on a specific product or category? Let’s choose our created category. If the discount is still visible for other sales channels besides the online store, select them. Now, the discount can still be linked to certain conditions, either that this is only valid for certain customer groups or that a certain minimum purchase quantity must be met. If you want to limit this discount code in the frequency of use, it can be used either only X times or with the second hook, only once per customer account. Finally, you can define whether this is redeemable in combinations with other discounts and finally set a period in which it is valid. If you save the whole thing, the discount will be displayed here. This means that you will be able to view all active, planned and expired discounts here as well.
Shopify agency eBakery
This was our episode of Shopify Shop 2023 build.
If there are still any questions, get in touch with us in the comments. Our experts will take care of all other issues. Feel free to make your appointment right here.
Do you have questions or need an individual offer? Do not hesitate to contact us.
- 0/5
- 0 ratings
| Very bad! | Bad | Hmmm | Oke | Good! |
|---|---|---|---|---|
| 0% | 0% | 0% | 0% | 0% |
Haben Sie Fragen oder brauchen ein individuelles Angebot? Zögern Sie nicht, uns zu kontaktieren.